As loyal Crunchy Betty readers, you’re more aware than most people about what products you put on your body and what they contain. So you know from experience that you can create handmade products that are just as good, or better, than their store bought alternatives.
And as G.I. Joe said – knowing is half the battle!
I truly believe that we can live cleaner, greener, more creative and less expensive lives by making things ourselves. How? By rediscovering the tips, skills and recipes from our past! Why struggle to figure out something myself when people have been creating and using lovely beauty and health products for generations?
Here’s a recipe I love because it uses something that is so abundant in nature – daisies!
Why Daisies?
Daisies are easy to identify, grow everywhere, are quick to pick, and actually have a medicinal use … applied externally they’re great for bumps & bruises!

You’ve probably seen expensive tubes of Arnica cream for treating bruises. Arnica works brilliantly, but it doesn’t grow in England. And rather than buying expensive specialty ingredients, why not use something that’s in our backyards?
According to my old herb books, daisies are good for sprains, bruises, aches & pains. Daisies are antiinflammatory, a wound-healer, and reduce pain. In modern life, I think this salve would be brilliant for bruises, sports injuries, sore muscles, arthritis and of course dry skin! Just please don’t apply on broken skin. This salve is for closed wounds and bruises, etc.
I love this project because it combines a vintage remedy with some outdoor foraging and some not-too-taxing time in the kitchen. There are two steps – make a daisy infused oil, then turn it into a salve. You could just use the daisy oil as a bruise healer, but it’s a bit messy to carry in your handbag.
Note:As always,use common sense with this project. If you or your family is allergic to the daisy family, this isn’t the project for you! Always test any of your homemade projects on a small patch of your inner arm and wait 24 hours to see if you have any reaction before proceeding, just in case!
Make Daisy Infused Oil
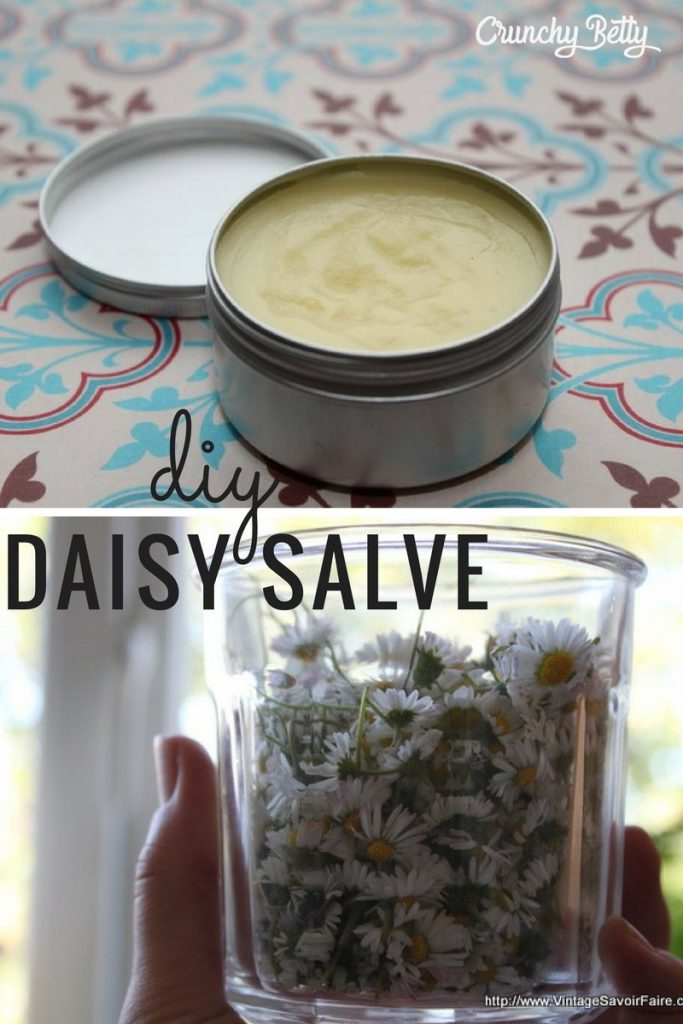
It’s really easy to infuse any herb into an oil. Gather a lot of the plant, preferably on a sunny day. I used 2 big handfuls of daisy flowers.

Find a jar that fits the amount of daisies you have collected. We want the jar to be completely full of daisies and oil. Put the daisies in the jar, cover completely with olive oil, cover the jar with a lid. Let the jar sit in a sunny place for 2 weeks.

After 2 weeks, strain out the daisy flowers and save the oil. Really squeeze the daisies to get every bit of oil out. You can use the oil as-is, or you can proceed to…
Make Daisy Salve
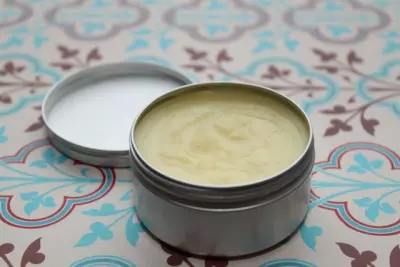
Daisy Salve for Bumps & Bruises
How to:
- Measure your daisy-infused oil.
- Math time! (Don’t run away. It’s easy, I promise.) Work out the proportions of oil and wax needed. For every 4 parts oil, you need 1 part beeswax. So, for example, if you have 1 c. of daisy oil you need 1/4c. of beeswax. I used 200ml of oil and 50 ml of beeswax.
- In a bain marie (or double boiler), combine the daisy oil and beeswax. Heat gently and stir until completely melted.
- Consistency test –We need to check how hard the finished salve will be. There’s no right or wrong answer, it’s a personal preference. It could be soft and slightly oily, or set like a lip balm, or very hard and waxy. Think about how you’ll use it. I carry mine in my handbag, so I like it to set quite firm … but so that it will still melt when I rub my finger over the salve.
- Do the consistency check by taking a small spoonful of the liquid and placing it in the freezer for 2-3 minutes. Remove from freezer and check the consistency with your fingers. If it’s too hard, add more oil. If it’s too soft, add more beeswax.
- Remove from heat. Add 10 drops lavender essential oil (amount for 1c. of daisy oil).
- Pour into clean pots,and let them cool. If you want a smooth surface on your salve,don’t touch the pots while they’re cooling! Once cool, cover tightly. Daisy salve should last at least one year or more.

How to Use Daisy Salve
I love my daisy salve! I split mine between a bigger jar for home,and several smaller containers to keep in my handbag. I use it for everything. Just rub some onto your fingers and then onto the affected area. I use my daisy salve for bruises, sprains, sore muscles, cuticle moisturizer and sometimes a lip balm.


Hi there,
I live in the Rocky Mountain range and we have a lot of rockslide daisy nearby. I’m wondering if it is ok to make tea and salves from any daisy in the daisy family or if it has to be white daisies.
Thanks!
Wendy
Do you know if it matters which types of daisies are used for this? I want to get some daisies to plant in my garden but the home garden store by me (lowes) is out of them. 🙁 I’ll. Have to grow them myself, but i am much too impatient to wait for them to grow before i make this lol. I believe they do have the colored daisies though. They are a different kind, but i wasn’t sure if they would still have the healing properties of the white (shasta-i believe they are called) daisies.
I don’t know if you will still reply to this message or not… Do you think you can use Grapeseed Oil? Just curious!
Hello lovely lady’s
Thank you so very much for sharing this information,I have been bussy with calendula leafs and put them on oil,I also have comfrey and rosemary on oil (-:
So now I’m goning to give the daisys a try and the dafodils, the two of them grow here in the Netherlands everywhere.
Can’t wait for your other recepes. greatings Ria
I now have another reason to plant daisies this spring! Between my 2 boys getting bumps and bruises to my husbands aches and pains from work and racing his dirt bike ( insert eye roll here ) to all my bsuises if you just look at me to hard this will be something i will make very soon!
Where did you get the little container you put yours in, shown in the first picture?
I made this and have been using it for a few weeks now. I am AMAZED at how well it works! I use it on everything that does not have broken skin (bruises, bumps, burns, cramps, soreness, etc) and it helps with everything.
I put it in 2 in. deodorant sticks and made it pretty solid to just rub on the hurt area. I’m a stage manager and let my crew use it after working if someone gets hurt. They love it too!Thanks so much for posting.
Since I live in the deep south of GA, the daisies here are in bloom now. I have had this blog bookmarked for ages but am just now finally able to make my own daisy salve. Thanks for the great tutorial! I am linking you on my blog Hippie Chicks. http://hippiefarmchicks.blogspot.com/
I was just diagnosed with arthritis this week, so I can’t wait to try out this salve! I’m wondering the same as Stephanie and Amy – does it matter what type of daisies you use? I can’t find white daisies right now, so I bought some yellow daisies instead. Will those work?
I was wondering if you could be more specific than daisy? What does the whole plant look like? My daisies are much much larger than yours seem to be (1-2 in diameter).
My non-crunchy sis was just telling me about arnica gel this past weekend and then I saw this post! Timing always amazes me. I’m definitely going to make her some of your daisy salve for Christmas, but I’m curious about something… I’m probably over-thinking this, but does it matter what kind of daisies I use? (We have a Euryops in our yard, which has yellow “daisy-like” blossoms.)
The daisies I used were yellow (from Kroger, 99 cents a bunch) and the salve I made works wonders!
This sounds great! I actually considered pulling one daisy plant growing by my deck because I thought they were more of a weed in that location. Definitely need to reconsider that idea since reading your post. I would have never thought they had any healing properties to them, thanks for sharing. I think I still have some arnica cream in my bathroom that I haven’t used in awhile. I like the idea of making my own stuff so I don’t have to rely on someone elses product. I was wondering if you could use the daisies in a bath as a relaxing soak. I think it would be fun to light some candles and sink into a bath of flowers.
This sounds like a great recipe but I don’t have any beeswax. Do you know where can I get some? I wonder if the health food store near me has any. Guess I will have to check into that soon.
I bruise like a peach. I’ll have to try this stuff.
When I was in Brazil, I was given a salve to put a particularly nasty bruise. I smeared a little on a few times that day, and the next day it was almost gone. I have no idea what the ingredients were, since the label was in Portuguese. I’m guessing arnica?
How fast does the daisy salve work? And do you have to dry the daisies a bit before you put it in so the oil doesn’t rot?
I am infusing calendula in oil right now in my sunny window in order to make a general purpose salve like this daisy salve. Such fun!!!
I have a great trick to prevent bruises. It is especially helpful with kids. It is a friend who told me about it from another friend’s grandma. Vanilla extract, from from kitchen! Just rub a few drops on the area right when it happens. It is amazing! It even smells nice. I have no idea why it works, but it does.
This is the exact same technique as a Calendula Salve I found (I think I was blog-surfing from CB!). I made it with dried calendula flowers from a health store, for use as a diaper rash cream. I love it and even convinced my hubby to try it when he had some chafed skin!
I was wondering, both then and now: is there any reason to use EVOO? or can I save money and just use plain (but organic!) oo?
You can make an herbal salve like this from almost any oil/herb combo. Calendula is a brilliant one, it would make a good all-purpose healing and soothing salve.
My opinion on oils is that you should make sure they’re ‘mechanically’ obtained – so they extract the oil by crushing the olives/fruit. If it doesn’t say ‘cold pressed’ or ‘mechanical’, then there’s a chance they use heat or chemicals to extract the oil which is no good! But other than that, not sure EV makes a difference in my experience.
I think I accidentally put in the “extra virgin” when I was going through and reformatting the post to work in WordPress. I thought it had said that, and I’d just accidentally deleted half the sentence. Oops!
Anyway, “virgin” olive oil is always mechanically pressed (which makes it good), but if it doesn’t say “virgin” or “extra virgin” on it, it has been solvent or heat expressed.
“Extra virgin” means it’s cold pressed – for sure – and completely free of impurities. It’s just a habit of mine to write “extra virgin olive oil” whenever I write “olive oil,” because I’d rather direct people to use the purest, least chemically altered product there is.
But whatever’s in your budget is what’s best for you!
This is AMAZING! I cant wait to try it out!
This looks amazing! My mum has pretty severe arthritis. Her birthday is coming up, so I’m definitely going to make some of this for her. Thanks!
Wonderful! I was just think last night that I wish you would have something about bruises somewhere in the Crunchy Betty community.
i wish i had daisies at my house…i get a lot of bruises from hooping so i’ve already broken down and bought some arnica gel but i never even thought to look for a home made remedy! poo. anyways, i might feel silly buying daisies to make it since foraging is half the fun 🙂
Hi Mamie, I understand! Buying daisies at the florist kind of defeats the foraging and the money-saving aspects 😉 But maybe some of your neighbors have daisies they wouldn’t mind sharing. Or come to England, we have millions!
this is true, i’ll have to keep an eye out 🙂 also, i think my boyfriend’s mom buys flowers for decorating pretty often and then throws them out when they start wilting so maybe i could just wait for when the time is ripe. England sounds even lovelier than what i usually imagine!(which is pretty lovely since i live in the US)