Yep! It’s Tuesday already, so we’re thinking outside the box. AGAIN!

Do you remember that time I totally cheated? No. You probably don’t, because it just happened.
For this Tuesdays Outside the Box, I’ve actually combined both ideas into one; or, rather, let’s just say there’s a whole lot of herbs up in this blog post right here. I’m not sure if combining the two is cheating, or just downright awesome. You be the judge.
Remember, if you’ve ever blogged anything regarding alternative uses of old jars or ideas on small-space gardening, TODAY is the day to link it up at the bottom of the post, so everyone can enjoy your genius. And if you don’t have a blog, but you have an idea, LEAVE A COMMENT OH MY GOSH PLEASE.
Thank you.
Now, today’s Tuesdays Outside the Box was chosen because small-space gardening is something I really, really, really need help with. My thumb is not green. It’s the opposite color of green. A little maroon maybe? I’ve almost mastered the easy-peasy art of keeping herbs, but the thought of growing anything else sends me into spasms of fright.
So my contribution to thinking outside the box for small-space gardening is just this little tea party herb garden I put together. Oh, and my jar contribution? It’s just kinda, you know, whatever …
Tuesdays Outside the Box: Small-Space Gardening
Here’s the “tea” party (wouldn’t it be fun if I was actually growing tea in these containers?) that sits outside on my deck table (now that the weather is warmer):

Originally, the concept was supposed to go like this: The herbs in the mugs would hang on the “mug rack” in the middle, tilted up just enough to make sense. Instead, this is what it looks like when it’s put together the way I conceptualized it:

As you can see, the mugs had no intention of tipping up to any degree, so instead, I set it out as if I’m having an actual party for actual friends who will soon be drinking dirt and herbs.
The cool thing, though, about my little concept, is that it cost about $7 total to make (not counting the seedlings … with the seedlings the total was about $25). I bought the glass mugs at the dollar store, and the tea pot, stand, and bowl with mint in it, I got at the thrift store on their half-off day.
I love the half-off day. So does half of the city.
On half-off Saturdays, it feels more like you’re in a mosh pit than in a thrift store. Hardcore thrifting.

As you can see, my rosemary is doing incredibly well. As is my fancy spicy basil there in the background, and the cilantro, too, even though its container is so very small. I’m having some problems with my basil, though, so maybe someone out there can help me.
I know the containers are a little small for basil, but they’re beautiful and perky when I keep them out of the sun. Is that normal? I thought basil needed a lot of sunlight, but mine seems to be the exact opposite. Basil is my herb gardening Achilles’ heel, so if you have any expert insight on how to raise a healthy basil baby, please share it.
So my outside-the-box tip for herb gardening is this: Get funky with your containers. Visit your thrift shop and see what totally fresh ideas you can come up with.
(Just make sure you put small rocks at the bottom of your containers, for drainage purposes, especially if you’re growing in small containers like I am.)
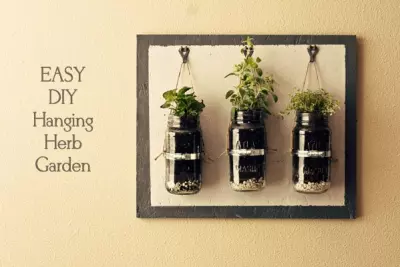
Tuesdays Outside the Box: Using Old Jars
This, my loves, is my piece de resistance. Words cannot describe how happy I am with the way this turned out. And this is also where I cheated.
My problems numbered in the twos. I needed somewhere to grow lemon balm, sage, and thyme, and I also needed to get started decorating my new place. Not only am I a skittish gardener, but I am just ghastly at things like spacial reasoning (which is great for decorating) and drawing a straight line (also good for decorating).
But today. Today I faced two of my biggest challenges and kicked them both in the complicated butts.

Before I tell you about it, I need you to forgive me.
Forgive me for not documenting the steps I took to make my herbal hanging garden. Truth be told, I was prepared for it to fail – big time – and I had no desire to have photographic proof of my colossal tragedy.
I’ll tell you how I did it, but understand that I may have to use terms like “thingies” and “hook whatsits.”
First, let me tell you what I used (also followed by the price, so you can get an idea of how cheap this was):
- Three old jars, reused (free)
- Scrap plywood from Lowe’s (Free! They just gave it to me! Check in the section where the wood cutter is and see what you can find)
- Two small trial-sized paints ($6 total) – I have TONS left, and they’re two of the colors I want to use for my bedroom decorating, so they will see much more use
- Two push-in picture hangers ($1)
- Three hose clamps, found in the plumbing department ($3)
- Twine (leftover, not sure how much, but let’s say $0.15)
- Hooks ($2)
- Seedlings, soil, and rocks (approximately $12)
Total: $24.15
Not bad for a piece of art that’s actually functional, right?

This concept actually came from something I pinned a million years ago. Only, instead of storing Q-tips, I’m storing gorgeous greens. I have to give her inspirational credit, though I didn’t do it exactly as she did.
Instead, here’s what I did:
- Painted the majority of the board the lighter color and then let it dry. After it was completely dry, I taped off the straight lines for the edges and painted the darker color along the edges and sides. Let that dry completely.
- In the meantime, planted herbs in the jars, making sure to use small rocks at the bottom for drainage. Drank a glass of iced tea. Thought about feet and how weird they are.
- Secured the hose clams to the jars and tied the twine to each side, measuring (mostly accurately) by eye to make sure the jars would hang mostly level.
- Measured out where the hooks should go and then secured them to the board.
- Hammered in the picture hangers to the back. Hung it on the wall.
- Attached the mason jars to the hooks.
And voila:

If you didn’t notice, I’m really proud of this.
It’s like … like I became an adult today.
Adults put rocks in the bottom of their herb jars, by the way.

You should probably look at it one more time.

Alrighty.
Now we’re done with me.
Share Your Tuesdays Outside The Box Ideas HERE!
What neat-o ideas do you have for small space gardening? (If no one mentions the everlasting green onions or romaine lettuce, I will cry.) Or the best thing ever – reused jars??
Leave your comment now, today, right this very instant.
Or, bloggers, if you have a great idea that goes along with our weekly theme of old jars or small-space gardening, here’s where you link up!
 How to Win Happiness and Influence Yourself
It’s perfect time to make some plans for the long run and it is time to be happy.
I have learn this submit and if I may just I desire to suggest you some fascinating issues or advice.
Maybe you could write next articles regarding this article.
I want to learn even more things about it!
I really love small garden ideas. I usually use old gutter parts or old drawers, food containers and stuff like that. I feel good, because I both recycle and create beautiful things at the same time.
Hey there! I’ve been following your web site for some time now and finally got the bravery
to go ahead and give you a shout out from Houston Texas!
Just wanted to mention keep up the great work!
1) Before you do any form of singing, it’s really important, and of great benefit,
to WARM UP THE VOICE. The singer is holding the air
in the body, not pushing air out or bearing down. If you’re just starting,
there are numerous tips that can give fast enhancements to your singing.
Hello just wanted to give you a brief headcs up and
let you know a few of the images aren’t loading properly.
I’m not sre whhy but I think its a linking issue.
I’ve tried it in two different browsers and both
show the same results.
A motivating discussion is worth comment. I think
that you ought to write more on this topic, it may not be a taboo matter but usually people don’t talk about these topics.
To the next! Many thanks!!
I have done this in my home and it has made that room look wonderful. I tried using bottles in my kitchen and planted herbs in them, they are growing great and make that wall smell spectacular!
Now, today’s Tuesdays Outside the Box was chosen because small-space gardening is something I really, really, really need help with.
What can you find to eat on the internet today regarding dieting on a budget with hypothyroidism, here is
a look at some vitamins, minerals, nutrients
/ foods and some herbal applications to consider.
Ok, this post really made me laugh. I can totally get on board with feeling ridiculously proud of projects like this. It looks great btw!
I must have that little garden on my wall! And, I think for your cup garden, what if you got some mugs where the handle tapers at the bottom instead of being symmetrical? Those always seem to hang at an angle.
Just stumbled across your site! You rock! Especially with the rocks in the bottom of the jars.
Yea, you did it! And yes I did need at least one more look.
Adding this to my to do list . . .
Very crafty and clever, Betty!
Basil is challenging to grow. Period. I live in a Mediaterranean climate and I can barely keep it alive for a short time. I gave up. Anything that finnicky can live elsewhere. 😉
Parsley is my favorite culinary herb to grow. Pretty and tasty and EASY! Add it to any dish and it helps the flavors meld better and pop. MMMmmm… I freeze it and add it to smoothies, too. Shhh….
Since your mugs and jars are clear, it’ll be easy to keep an eye on the level of moisture. Pour it off if you see a build-up or the soil starts to smell “off”.
If anyone has room for one of those so-called “strawberry pots” (strawberries do poorly in them, in my experience), I have found those to the best container for growing herbs! A different herb in each “pocket” and the largest herb on top. I’ve had the best luck with parsley on top, but calendula is there now and doing okay. Calendula just grows crazy here and is threatening to topple over the whole pot. The strawberry pot isn’t that big (mostly tall) and I put it on a rolling wood plant holder from Harbor Freight (2 for $5), so I can move it easily to follow the sun. Soooo easy to water all the plants at once! And, they get proper drainage and airflow. Easy, one-pot maintenance, which works really well since most herbs require similar conditions.
I saw this on pinterest a few days ago — planning to try it soon.
http://chickensintheroad.com/house/crafts/coloring-mason-jars/
It’s for tinting mason jars different colors. Since the color is on the inside you can’t use it for food or drinking anymore, but still great for storing stuff : )
Toilet paper rolls also make great seed-starting pots.
Thx, for this post Betty! It inspired me to start my Kitchen Herb Garden (just added to the post linkup). I have a small ladder shelf in my kitchen that was basically collecting dust, so decided to use it for the herbs I just potted in mason jars. They get tons of light and make the kitchen smell divine. I attempted chalkboard paint to label the jars, but that was a major fail. Anyhoo, I’m still pretty proud of them 🙂
just brilliant and beautiful!!!! I’ll be trying this when the kiddos are in school this week! I’d say this make for a great gift too!
As someone else mentioned I also use old jars for drinking, hot coffee on the go, storing my herbal syrups, concocting herbal vinegar cleaner, body scrubs, and I also have a waterless, oil-based beeswax lotion that I make directly in the jar that it’s stored in. I’ve also been doing mason jar oatmeal breakfasts (steel-cut oats, milk or yogurt, flax or chia seeds and some fruit or cocoa powder… just soaking no cooking).
I personally like the idea of one large pot with all the herbs you’ll need. Or perfect salsa garden idea if you have the extra small space…an upside down vertical bucket tomato plant with growing herbs on the top
I so super love your herb tea party! I’m a major sucker for any kind of unique planter or display and this one tickles me! I feature “Container Garden” roundup on my blog occasionally and I’d love to feature this in my next one…
This looks too cool. I love your idea. I have a small yard and am always looking for creative space ideas. Thanks for sharing.
I know absolutely nothing about growing things, but your post makes me want to learn, and by the way your arrangements are adorable and very creative. I AM kind of a nerd, though, so, I can make a suggestion. If you find mugs with the handle closer to the top of the mug than the bottom, they will have more weight on the bottom and hang down on the mug tree the way you had planned. Which would also be adorable.
I have read that you can grow basil in shade.I know that goes against everything I’ve heard before,but maybe you could keep the basil out of direct sunlight for a week and see what happens? Darlene
Jars… My makeup brushes and Q-tips are in the tiny quilted jars in my bathroom. Bigger jars get used for gift giving sometimes. I made a bunch of bath bombs and tub truffles for my beloved’s mother and packed them in a big jar and sent them to Hawaii that way, tied with ribbon and some corresponding dried herbs tucked amongst the goodies. (I forgot to label them, and his dad ate a bathbomb….) Otherwise, they get used for drinks and food storage. Yeah, I know.
I kept a betta in a quart jar with holes in the lid. Well, two. I had two sets of gravel and two plants, so when he needed fresh water, I’d fix a new jar, scoop him into it, clean the old one and let it dry out thoroughly. Never had an algea problem, and he lived over a year after I bought him.Small space gardening…. http://journeytoforever.org/edu_cardboard.html#column http://www.windowfarms.org/ Good ideas! I’ve been growing carnivorous plants under artificial lights to help with pest control. Asian pitchers (nepenthes) and sundews (drosera). My next step is a vertical herb garden in the dining room with artificial lights. We get zero good sunlight for growing anything and no patio/balcony. It has to be a hanging garden and it’ll have to be above waist height – busy toddler grabby hands, but it should be fun!
My sister-in-law uses old glass light shades for her windowsill herb planters. They come complete with their own drainage hole. Very clever!
Not 100% small space gardening but close. We rent and therefore do not plant in the ground or in raised beds. We container garden (this year it’s green beans, tomatoes, basil, green peppers, lettuce, and spinach). Our uniqueness comes in where we put our garden-on an old picnic table! Makes watering and weeding no stress on the back and we don’t have to worry about rabbits or our dog getting in the garden and eating it. The height does not deter squirrels or birds but our problems have been few with those critters.
As for jars, we store our food in them. How lame is that?!?
An excellent alternate use for canning jars is making citronella/lavender/cedar candles for the patio/deck/balcony table, to keep the Mosquitos and other flying, biting critters away while your enjoying the spring, summer and fall air – in the southeast, it seems to be mosquito season 9 months out of 12.
Regarding the basil, second the suggestion of too little drainage, too hot soil in the clear containers. To test whether you’ve got root rot or the soil’s just too hot in the sun, you could try wrapping the container with brown paper and see if it still wilts rapidly. Most plants can’t take the level of heat that builds up in a clear container in the sun, especially a small clear container, so if you keep them all in the glass, you may want to paint the glass to give their roots some shade. A diamond drill bit used carefully will allow you to add drainage holes, too. Small containers will be fine – many herbs do well even when root bound, especially if you keep the aerial parts small with frequent harvest, but many of the culinary herbs are from dry locations, and all will do better with drainage and shade for their roots. Best advice for successfully growing any plant is to think of their location of origin and then try to (loosely) give them comparable conditions. Not many plants grow with their roots in the sun (some orchids do, but they’re plant weirdos), so for those that don’t, give their roots some shade (potted plant roots frequently grow to the outside of the container and circle it, so they’ll soon be hanging out in the sun if you don’t paint or otherwise shade the roots.
Alrightee, so first off, Basil is everyone’s problem child. Then I only want to suggest that instead of rocks, use something like nut shells for drainage. Physically lighter end product.
The coolest thing I’ve seen done with old jars was a light fixture for the kitchen. I totally want one! http://sodarling.blogspot.com/2011/02/unique-diy-lighting-fixtures.html (scroll down a bit…)
I am loving your garden wall art!! It is truly one of the cutest ideas I have seen. And the mugs? Adorable!!
I posted these herb garden ideas on my blog awhile ago: http://goincrunchy.blogspot.com/2012/02/next-on-my-to-do-list-grow-my-own-herbs.html I have tried the green onion thing…it works OK…but not as great as I had hoped. Ideas for mason jars? I use them to hold stuff, lol… Pencils, money, odds n ends. I have been meaning to attempt using them as hanging lights out on the deck. Its finally warming up enough that I have no excuses and just need to get busy. They are great for filling with cookie making ingredients and giving as gifts to friends.
Holy Sh!t Betty! thats your best idea yet. I’m already scouting around to see what i can trick up, cause I could use that same jar concept for all the macerations I have going on, whoot whoot!
Im going to figure out how i can do that over a window so that the sunlight will contribute to the maceration process.
Freaking Sweet!
Not overly original, but I use old jars as drinking glasses. I always have tons around, they’re durable, and if they break I don’t really care. Plus ones with lids are great for keeping my cats from dipping their paws in my drinks.
I do this also, but I also use them for coffee on the go. They are good heat insulators and I can put the lid on and toss in a bag when I’m frantically rushing out the door as I always do. 🙂
I linked up my homemade seed starting mix. While it isn’t TRULY something you can do in uber small spaces, I use it to grow plants inside, and I have pictures of my tomatoes that have been grown indoors!
The herb jars turned out fantastic! I have had that same link pinned for, like, ever.
I LOVE your blog!
Luv them! Great job on the hanging jars. It’s an industrial shabby chic combo.
As for your basil, I am wondering if there is adequate drainage. If not, the roots may have rot, thus when you place them in the sun they cannot take up water quickly enough to match the increased rate of transpiration. Also, the long basil there looks like it could be pinched back already – pinch of the first set of large leaves (from the top down) – this will encourage more branching and a bushier plant, which will be less likely to topple your small mug.
here’s to a summer of fresh herbs!
Oh, and here’s another idea. Find or buy a shallow tray, or re-use store-bought ones that you buy salad or mushrooms in. Punch drainage holes in the bottom. Fill with mulit-purpose compost. Scatter with mixed leaf seeds (include some purple and red ones), cover lightly with more sieved compost, and water. Cut the leaves with scissors when they are still baby-size. They will re-sprout 2 or 3 times. So much cheaper than buying them ready-bagged. I grow them outside on any available surface, but they would probably grow on a shady windowsill. Hot sun will wilt them.
The top of the refrigerator may also be a good place for these to grow. I had actually wanted to try that this past winter but was sick for awhile and never got around to it : (
An idea that will look just great in a kitchen and impress all your friends is to group together several pots of individual herbs in a wicker basket and display it on your worktop. Just line the basket with plastic to protect the wicker, and find a spot that gets some sun. Have some tall ones and some that trail over the sides. Then when you’re cooking just pinch a few leaves off like the TV chefs do. Very satisfying.
Wish I had room to do that : (
This isn’t exactly jars but a friend came up with this idea using old vases and I love it. http://www.awrensnest.com/blog/wp-content/uploads/2012/03/bud-vase.jpg
Sorry to write this but you have to have better drainage for these babies–I know, I’ve killed a few plants by putting them in containers with no holes in the bottom (even promising to myself I would NOT overwater–accidents happen and then the plants go into a slow demise). What you have is very beautiful, but if you want to go this route, I’d suggest putting them in another container (with holes in the bottom) that can be popped out for watering and draining. Almost all herbs need full sun, too. Probably the reason why yours are reacting to it in a not-good way is because the clear glass makes the dark soil absorb heat immediately and it gets too dang hot! (I’ve also fried my share of plants. Plant killer, that’s me…but that’s how you learn.) I could see this working swell with cacti, succulents or air plants — plants that require little or no water–as long as you made sure to water sparingly.
A really wonderful all-the-herbs-you-can-use gardening container for a smaller space (balcony, porch) is a half whiskey barrel. You can fill it full of basil, or a mix of herbs and it’s like a mini-garden.
Y’know, I should’ve mentioned this in the post, but it was getting SO long, and I didn’t want to be too talky. I actually discussed the situation with the woman at the local garden center I went to when I bought the seedlings a few weeks ago. I know that poor basil doesn’t belong in those little cups, and that’ll change soon. But she did say that if I lined everything with the rocks and made VERY sure not to over water that everything else would be just fine. It just won’t grow BIGLY. And that’s okay; I just have zero space for bigger containers. Sigh.
I LOVE the way you’re thinking, though, ’cause I almost went with doing terrariums in those jars instead of herbs. That would be absolutely gorgeous. But, dangit, I needed space for sage! Ha.
You could use a glass bit on a drill to make small drainage holes in any of those containers if you want! Put an “X”of masking tape over the area you are going to drill and go very, very carefully. Make sure the container is full of something during drilling – sand, dirt, etc., to keep the pressure equalized.
I love your crafty mason jar project… definitely “Pin-worthy”! I think you’ll eventually be wanting to transplant those herbs to bigger pots (with better drainage). The great thing is that you can see through the glass jars and tell at a glance if there is too much water in there. Most plants don’t like having “wet feet”. They should be happy for a while though, and in the meantime you’ve got a head-start on your summer herbs while you keep your eyes open for some pretty pots. 🙂
We’re concentrating on herbs mostly in our yard, since we just don’t
have enough sun for most vegetables. New additions this year: tarragon,
stevia, parsley, and cilantro (all in pots or barrels). Half-barrels are my favorite for herbs and smaller veg (and they look good on the patio). Just be sure to drill a few holes for drainage. Successful gardening is all about drainage… and soil… and sun… and water… and patience!
Love your jar herb garden. So pretty (and functional!) I’ve linked up to a tutorial on how to create a small herb garden using a shoe organizer! 🙂
Hmm, what if you put all of the rocks on the bottom on the opposite side of the handle? It might help the mugs stay at an angle.
I’ve never grown anything on my own, partly because of teh lazy and partly because I am living in dorms/apartments for ten months at a stretch. But your mugs (which are definitely more awesome than cheating) have convinced me to start: with some lettuce, onions (in a pot, as this is apparently less maintenance than a jar), and rosemary. And some Melissa, of course. 🙂
…My parents might be a bit surprised when their newly vegetarian, short-haired, herb-growing youngest offspring returns to the roost.
Here’s what I do to reuse old jars:
http://kittycafe.typepad.com/kittycafe/2011/10/big-and-small-messes-i-mean-projects.html
unfortunately it is in the middle of a long post!
What do you do for drainage for the plants?
I really like the pallet gardens that have been popping up around the Net lately – you can reinforce them and hang them, or let them lay flat. It’s like having a pre-set square foot garden!
And the first thing that comes to mind with reusing old jars is making hanging lights out of them. We made a singular light for our son’s nursery out of a blue quart Ball jar, but pint or jelly jars would make awesome-looking outdoor party lights. Especially if you stained them first? Oh yeah. http://www.bourbonandboots.com/store/products/mason-jar-lights/
OK, OK, I’ll mention it…green onions will grow and grow when placed in a glass of water on a windowsill, just change the water out frequently. If they grow too fast, snip off the greens and store in the freezer. As far as lettuces and celery… yup! Cut off the bottom section (the part you normally chunk in the trash) and place in a bowl of water for a day or two. Then plant it in a tiny spot of garden, leaves up. Wait for it….. wait for it…. delicately snip off what you need as it grows! TADA!! Free stuff!
As for basil… love the stuff, grow lots and lots of it. It does need sun, and a lot of water, but I have never been able to grow it in tiny pots. It gets 3 feet tall and big! Give it space, give it room, the roots really spread.
For the super-lazy-yet-super-creative crunchies among us, a gardening tip from my master-gardener mother: for the fastest and easiest veggie garden EVER get a bag of potting soil, lay it on the ground, deck, patio, driveway, wherever. Mark off a “window” on top with duct tape and cut out the plastic inside the tape. (Could probably do 3-4 for herbs? hmmmm) Poke a few holes in the plastic on the bottom of the bag to allow for drainage (maybe place on that pallet you have been saving to make something fabulous?) Plant your seedlings directly in the dirt. Viola!! Instant garden!
Hmm ok small space gardening, lemme think. Well one thing I’ve got my head around this week was that the ‘norm’ for gardening didn’t need to apply. I was panicking because the place I wanted to plant some vegies wasn’t going to be ready in time for me to get some seeds in before the first frost. Then it dawned on me – stuff it, just plant them somewhere else. So soon I will have snow peas growing amongst the front yard…which isn’t normal, but hey, it’s a plant, it’ll grow where the dirt is!
Reused jars, oh boy do I have a lot of them. I’m planning to put a few to use in the homemade yoghurt trial tomorrow night. And there are the ones in the garage full of tiny bike parts. And the ones in the bathroom full of oils. And the ones on the windowsill with drying herbs. And the ones in the pantry full of foooood 🙂 Nothing very out-of-the-box, but well and truly in use in this household!
This looks great! Congrats on such an inspired and successful hanging garden!
Right now, I use my jars for making yogurt via the guest post that was on your site when you were moving!
For space saving gardens that are inexpensive, I have found a great way to start seeds so that you don’t need to buy plants. Via this pin: http://pinterest.com/pin/247205467015626059/ I now have basil, thyme, and thai basil seedlings started. Using empty egg shells was great. A) they look super cute and I plan to simply crack the shell a bunch and put the entire thing in a pot, which will give added nutrients to the soil and plant. Using egg cartons for a bunch of seeds is also a great way to start a garden. The cardboard helps keep the soil moist (I think) and the depth of the soil is perfect. Using old newspaper to make plant/seedling pots is also great. I made a bunch of those as well. http://pinterest.com/pin/62698619782305647/ The great thing about all of these is that they can easily sit on a window sill, etc.
I recently bought a small rolling cart that all of the seeds are on, so I can rotate them towards the sun and so they don’t get majorly lopsided.
Thanks for a great post!