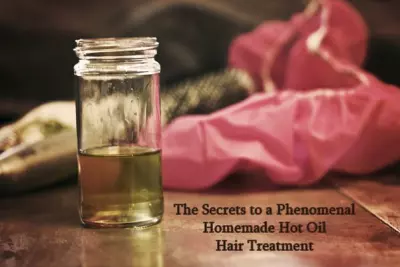
As I write this, at noon on a Tuesday, my hair is covered in the hot oil treatment you see pictured in this post. My locks are topped with the pink shower cap. The sun is shining and it feels like spring in January. My cat … he is licking my neck.
Life is good.
Of all the crunchy things you can do for your hair, the hot oil treatment is – by far – the most satisfying and luxurious. I do them once a week, on average, and I’ve finally gotten the routine down to an art. Here are my secrets, and a step-by-step guide to getting the most out of your own homemade hot oil hair treatments.
This is a LOT of information, so today we’re just going to cover the basics on how to create your own hot oil for your hair and all the yummy goodness you can add (or not). Part 2 will be the best ways to apply, clean off, and use your hot oil hair treatments. (Too much information, so little room on the internet.
Your Hair On Oil: Why You Should Do a Hot Oil Hair Treatment
You may be thinking to yourself: “My hair is oily already. Why on earth would I do this?”
Or, alternatively, you may be thinking: “My hair is so dry! Why haven’t I done this already?”
Either way, good news. The hot oil hair treatment is for ALL types of hair, and you can customize it to do awesome things for your mane, regardless of its texture or typical condition. The key is to choose the right ingredients for your hair type.
The oils you choose will infuse your hair – made up primarily of a protein called keratin – with much-needed moisture and strengthening compounds, leaving it soft and flowy. Helping you get rid of that annoying frizz. Leaving the unfortunate split ends smoother and less noticeable (at least for a while).
Choosing Your Oils
Frankly, you can use just about any oil you desire for your homemade hot oil hair treatment. If you want to go easy on yourself, just heat up a little olive oil and slather it on your hair. That’ll do just fine.
But if you want to use a more personalized technique, here are the oils you should consider using (and blending!) for a more phenomenal experience:
- Jojoba oil: One of my favorites, and the best choice for those of you who have oily hair to begin with. The constitution of jojoba oil is much like that of our own natural skin and hair oils. It will leave your hair soft and light, without weighing it down.
- Coconut oil: My other absolute favorite hair oil. Talk about shine and softeness! Coconut oil is great for all hair types. And, as a bonus, if you have a bit of flaking or dandruff, a coconut oil hair treatment will help fix that right up.
- Castor oil: Many of you know, as per the oil-cleansing method, that castor oil has some drying properties. This makes it a great option for those of you with oily hair. But it’s also a powerhouse at adding strength to your hair, so those of you with thin hair that breaks easily, think about using castor oil in your hot oil hair pack.
- Sesame oil: This delicious oil adds conditioning and shine, and is great for any hair type; however, historically it’s been used to help slow down hair loss and was used to successfully treat thinning hair.
- Avocado oil: As one of the most emollient and moisturizing oils you can find, avocado oil is a particularly good choice for those of you with really dry and frizzy hair.
Of course, there are myriad other oils you can use in your personalized hot oil recipes. Oils like argan, sweet almond, apricot kernel, kukui … the list goes on. They’ll all leave your hair soft and shiny, but they may be a little more pricey and difficult to find.
You can stop right here, if you want. There’s no reason why, if you’re pressed for time, you can’t just warm your favorite oil, slather it on your hair, leave it on for 30 minutes and then wash. That’s perfectly fine.
But when you move on to the next step and add in herbal infusions or other goodies, you’ll take your luxurious homemade hot oil treatment to the next level.
Creating Your Fantabulous Herbal Hot Oil Hair Treatment
Truth is, we could do an entire month’s worth of posts just talking about the different herbs to add to a hot oil hair treatment.
Instead, I’m going to give you a breakdown of the most common ones and you can choose what works best for your hair.

The quickest and easiest way to personalize your hot oil is by using essential oils. However, I prefer to steep my oil in real dried herbs before using it. It just feels more … thorough. More crunchy. More fun!
You can choose herbs to help boost the color of your hair, to add even more moisture, to clarify and add shine, or to add strength and elasticity. Here are a few ideas:
Herbs for Your Hot Oil Hair Treatment
- To enhance the color of your hair: For brunettes, consider nettle, black tea, ground coffee, rosemary, sage, or ground black walnut shells. For blondes: Chamomile, rhubarb (not an herb, I know), calendula, or clove (if you want a more honey color). For redheads: Hibiscus (yes!), red clover, or chamomile.
- To strengthen hair: Use chamomile, nettle, horsetail, arnica, or burdock.
- To clarify hair: Rosemary, parsley, sage, nutmeg or witch hazel.
- To moisturize hair: Calendula, chamomile, lavender, catmint, dried rose petals, or aloe.
- To stimulate hair growth: Peppermint (yes!), parsley, horsetail, sage, chamomile, ginger, and cinnamon.
How to Steep the Herbs in the Oil
Once you’ve decided on the herbs you’ll use, you’ll need to infuse your oil with them. The quickest method is to steep the herbs in the oil over low heat for about 30 minutes.

How to do it:
- Place about 3 Tablespoons of the oil(s) of your choice in a makeshift or real double boiler. Turn the heat on low and add 1 to 1-1/2 Tablespoons of your chosen herbs. Let this steep for about 30 minutes on low.
- Strain the herbs from the oil into a small glass container using a piece of cheesecloth or a coffee filter.
- Move on to adding more goodies to your treatment, or start your hot oil hair treatment now.
- You can store this oil for up to 6 months in a tightly lidded container.
You CAN make a big batch of this to keep for the future. Just double, triple, quadruple the instructions above and store your hot oil hair treatment in a tightly lidded container for up to 6 months.
At this point, you can stop and use your hair oil just as it is, or move on to the next step, which is adding more goodies:
Adding Extra Goodies to Ramp Up Your Hot Oil Hair Treatment
This step is purely optional, but if you’re really serious about your hair treatments – or if you want to make this as a special gift for someone else – you might want to add some extra ingredients to nourish your hair and turn it into a sensation.

If you’re going to use your hair treatment right away, you can mush or whisk in in things like:
- Banana
- Avocado
- Egg yolk
- Berries (blackberry for darkening hair, raspberry for red hues, and strawberries for a little strawberry blonde action)
- Lemon juice for highlights or grapefruit juice to clarify
But if you’re keeping your hair treatment for a while, giving it as a gift, or just want to add extra incredible ingredients that take it to a whole new level, here are some other ideas:
- 1 tsp neem oil: this is a top-notch addition that will help strengthen, as well as clarify your hair (and it’s GREAT for dandruff)
- 3 drops essential oil: Like rosemary, tea tree, rose, rose geranium, lemon to clarify, peppermint to stimulate, or sage
- 1 tsp rose hip seed oil
- 1 tsp aloe vera gel (to moisturize, clarify and strengthen)
- 4 drops carrot seed oil (for out of this world moisturizing and strengthening)
- 2 tsp kaolin clay for purifying and cleansing
This is a lot of information, people, and we’re still not done. Tomorrow we’ll talk about how to get the most out of your hot oil hair treatment in terms of application and washing.
But, if you want it, here’s the exact recipe I made for my hair today. It’s clarifying, moisturizing, and strengthening. Just an all around great hot oil recipe.
Crunchy Betty’s Favorite Hot Oil Hair Treatment
- 1 Tbsp jojoba oil
- 1 Tbsp coconut oil
- 1 Tbsp castor oil
- Scant 1 tbsp dried rosemary
- 1 Tbsp dried horsetail leaves
- 1 tsp neem oil
- 4 drops carrot seed oil
- 3 drops rose essential oil
Place oils, rosemary, and horsetail in a small double boiler (or makeshift double boiler) and heat on very low, stirring occasionally, for 30 minutes to an hour. Strain the herbs from the oil into a small glass container using cheesecloth or a coffee filter. Add in the other ingredients and stir well. Use immediately or store for up to 6 months.
Tomorrow: How to Use Your Hot Oil Hair Treatment!
In the meantime, have you ever made your own hot oil hair treatments? If so, do you have any particular tips and tricks that have worked for you?
(And, don’t worry, I’m going to address the no ‘poo/oil treatment issue tomorrow, too.)

 Hair: Dead Protein or Alien Communication Devices
I did this hot oil treatment in a salon. It worked really well but only for 3-4 hours. Right now, it is the next day from the treatment.
What should I do to make my hair feel loke it just came from a salon?
I started doing hot oil treatments about a month ago and I see results already. My hair used to be thin and flat and oily. I started oiling my hair and saw results within two weeks. I was amazed. My hair became thick, shiny, LESS oily. I put a LOT of oil and have no issues washing it out. I use regular Pantene shampoo. I apply shampoo, massage it in and leave it for 5-7 minutes. Then I wash it out. Never had a problem washing out the oils. I used Alma, castor, coconut, argan, jojoba oils and many more. Just mix it all together, warm it up in the microwave and put on a heating cap for 30 minutes or more. I hope it helps 🙂
HI, I’ve used coconut oil and while it has left my hair soft, it leaves my hair very dull. Not sure why but it’s not the best for my thin, wavy hair. I have had really good results with olive oil and raw honey, you’ll have to work it in your hair quickly while it is still warm, otherwise it gets sticky. Once it’s cool, it will get a bit crunchy on your hair. I leave in for at least an hour and then wash my hair twice. It leaves my hair silky and it feels very strong and supple. Coconut oil does not have that effect, it leaves my hair stringy and thin-looking, even after washing it all out. I will try the jojoba oil as well, I’ve heard good things about that one. I have mixed in some castor oil with olive but the jury’s still out on that one. Thanks for your tips. Love your blog.
Hi, do I need to boil oils directly and apply, or we need to put oil container in bold water?
I have previously used coconut oil a few times as a hair treatment and have regretted it every time because it seems to be basically impossible for me to get out of my hair again afterwards? Every time I have used it I have had to shampoo my hair with very hot water like 10 times and it still looks extremely greasy the next day? Having to shampoo it that many times in one go makes me feel like it does more harm than good for my hair. Does this happen to anyone else or is it just me?
this is really amazing. I love it
Hello Betty,
I have one weird question. I applied coconut oil to my hair and to my surprise, I am experiencing hair loss and hair breakage. And after the oil trip my hair is very dry and brittle and when i comb it with my hand my follicle hurts. Why is this happening to me? Has anyone experiences hair loss from coconut oil. [yes coconut oil does make m hair look smooth, shiny, and beautiful but not worth it with the amount of hair loss].
Thanks
You may have already found the answer but you might be allergic to coconut oil.
Was it organic raw coconut oil? It would make a difference.
Hello i rewlly need my hair to grow, what do i do? What oil and herbs would go well togethrr to mske my hsir grow long? I hage really thick short hait
Please can you kindly advise where to buy the following items: carrot seed oil, dried horsetail leaf, dried rosemary leaf, sesame oil, calendula, Cinamon & chamomile
Question: my daughter went in and got her done. She has brown hair and she got the ombré style. my hair dresser used bleach on the end and it is stiff and feels like there is a ton of product in it and has to be brushed many times a day. It also feels like straw, hay. What to do?
Can you use the oils you get at the grocery store? Like regular Olive Oil? Or would EVOO be better? Can you use the Coconut oil you find in the store or should you go to a health food store?
Chances are they’ll have more time to talk with you in-depth and help prepare your roofing project when the weather becomes reasonable.
If it is your first time getting into an agreement,
you may ask somebody who is knowledgeable
in those matters. The best way to evaluate contractors’ efficiency is look for references in their completed work.
Fantastic tips..I knew I needed a hot oil treatment and didn’t want to get a store bought one because I just want the oils not the chemicals ( that help to lenghthen the shelf life) and this artical was just what I needed.
Hi. I went to cosmetology school as well as massage therapy school and I have to tell you that hot oil treatments are one of the most over looked things you can do for your hair and for your self. They are cheep and easy to do . My four little girls and I do them all the time. They thinks it’s great we have mommy/ daughter spa days. The one thing I do have to say is you need to make sure that all essential oils being used are pure therapeutic grade oils because if they are not pure they contain sulfides and other bad chemicals that will counter the oil you are using in your hair. Keep the blogs going.
I have very long colored hair that gets dry at the ends. I rub the Shielo Restoration Oil into wet or dry hair and the ends of the hair are just as supple as the hair at the roots. Plus, I am very, very tender headed and this Shielo Oil makes comb out easy-peasy.
Is it possible if i just put in 1 TBSP of oils (3 types as mentioned) and 3 Drops of Essential Oil, disregarding the herbs?
I am part of some type of weird hybrid breed of curly hair that looks thick because it literally takes over my head, but happens to be fine. I also have very sensitive skin which makes for an even more sensitive scalp. So I have to be careful even when going the natural route…. There are lots of good tips here. Olive oil and Castor oil are my two staples. I would also recommend Grapeseed oil as I did not see it in the list. I like those three because they are easy to get and you can pretty much find them anywhere. They are excellent base oils and mix well with others. Avocados and Bananas are manna from heaven for hair.
This paragraph is in fact a good one it helps new internet visitors,
who are wishing in favor of blogging.
Wonderful site. Lots of useful information here.
I am sending it to some buddies ans additionally sharing in delicious.
And of course, thanks in your effort!
My hair is a bit drier than it was when I was younger (im 45+). I also live in a very dry climate in western Colorado which also contributes to the dryness of my hair. I use the Shielo Restore Oil because its perfect for making my hair soft and moist again. I have short hair so I only use a small amount on my fingers and spread it through all of my hair. I can shower twice a day when necessary and if I use the Shielo Oil, my hair does not dry out. I like the result!
whoah this weblog is excellent i really like studying your posts.
Stay up the great work! You already know, a lot of persons are searching round for this info, you can help
them greatly.
Thank you for sharing your knowledge. I can tell u do this from the heart and really put energy in what u do
Can you use a chamomile liquid herbal extract in place of the raw herb? Would you add it in like Peppermint, just a few drops, or would you add more? Thanks!
Greetings everyone,
Just wanted to share here that if you are looking for exceptionally delicious oils to make this awesome recipe with, check out our site! Organic, Unrefined, Fair Trade and Pure, they really do nourish your hair from root to scalp. 🙂 We sell in bulk, and there’s also yummy essential oil blended perfumes, body butters and oils. 🙂 Happy Hot Oil Hair Treating!
hi wat a awesome article!! can i just slit open a black tea bag and steep it with the oil? thanks a million
My dermatologist recommends straight old olive oil!
I have oily hair, but still needed a conditioner at the same time to protect my color treated hair – and the Shielo Color Protect line works perfectly. Even if you do not put color in your hair. It makes my hair shine and the shampoo is not heavy. This is one of the first shampoos that has really worked for me, and the Shielo conditioner did not leave my hair oily at all.
dear ms betty…
do u sell ur oils..the place where i live i dont find herbal ingredients to make my natural oil at home..
can i buy from ur website or something..
Just wanted to say thanks for this, it really came in handy. Today I was being my usual independent self and spent several hours working on my car. As a result, I got dirt, grease, grit, oil, anti-freeze and yet more dirt in my hair. It was so bad today that I honestly thought I was going to have to shampoo my hair with Dawn. So I decided I would probably have to do some very heavy conditioning. Before I headed into the shower with my dish soap, I wondered if I could find a DIY hot oil treatment for my hair. And that’s when I found you. I read the article and decided it certainly couldn’t hurt, but I wasn’t sure it would work on the mess on my head. I made a treatment of coconut oil, almond oil and olive oil with an infusion of chamomile and followed your advice. It worked. It worked insanely well. “Like breaks down like” is my new mantra. No Dawn was used and my hair is very happy right now. And so am I.
Hello Ms.Betty.
Could I blend coconut oi, castor oil, rosemary oil & lavender oil together first and then apply them to my dry scalp & hair? Thank you.
I made a big batch for a girls pampering night years ago and steeped a vanilla bean in it…..I dont think it made my hair nicer than without it….but my oh my did it smell heavenly!!!!!
Hello all.
I just wanted to add that Argan Oil is, in my opinion, one of the best oils to repair. I am biased as we do have a company selling Argan Oil!
We also have a natural oil blend which contains our 3 favourite oils 1 for scalp and roots, one for repairing the hair shaft and another to add a high gloss shine.
You can do the hot oil treatment every so often but you can also use very small, 1 or 2 drops!, of oil warm the oil and work into hair after washing as a conditioner.
This also really helps protect against hot hair treatments like straightening irons.
More info, Argan Oil and some free ebooks on our site.
regards
Malika
One help how to filter moisture and herbel hair oil
i am going to use your hot oil treatment and i want to ask shall i add shop product herbal oil.
It says peppermint up in the how to stimulate hair growth… peppermint oil?
Yes, peppermint oil is the best way to stimulate hair growth. 🙂 Or you can steep it in the herb 🙂 Either way, it’s all good 🙂
Hi, I heard that the Neem oil would smell bad while using, but would your hair stink too because of it? Thanks xxx
Hello.i cut my locks about 4 months ago. I had them for about 13 years to me they wasn’t as healthy as they use to be so nowi rocking a short cut however i do want to lock again but my hair now has been shedding tremendously and i dont know what to do…can you please help me to get the length back so i can start over again
Hello Crunchy Betty!
I have seen on internet a few people saying that one should add no more than 3 drops of essential oil. I have so many issues with mine that I have bought 5 oils and I was planning to add one drop from each to the 3 spoons of oil, along with the neem and carrot oil, just like in you recipe. Is it too much? I have lavender, mint, sage, rosemary and chamomile. How do you think it would be most efficient?
Thanks a bunch!! I love love your blog 😀
Hello Crunchy Betty!
Love the idea of hot oil treatment, sounds soooo indulging already **
I wanted to ask you if honey or dairy products could be put in the oil aswell, as they are super good for hydrating the hair.
Bye miss!
888 here are very good site:
I’m trying to find the next article “How to use your hot oil treatment” but can’t find it, can you link it to me please?
just plug ‘crunchy betty hot oil 2’ into google and it will come up.
Does ground cinnamon work as well as cinnamon sticks? Right now, my oil is turning brown (I used coconut oil, parsley, rosemary and ground cinnamon)and I’m not sure if I’m doing it correctly. Also, if you don’t have any coffee filters, does a regular strainer work?
Mine turned brown too. It smells burnt. Not sure if it’s gonna do any good to my hair. I think we did it wrong.
Yazmin –
It’s best not to use metal with herbs and/or essential oils. It has chemicals that tend to counteract the very qualities that you’re trying to extract.
If you aren’t able to get coffee filters, I suggest trying a plastic strainer (used to drain water from pastas, etc.) with the smallest holes you can find.
Another option – it may not work very well, but it’s better than nothing – is to put a thick layer of paper towels over the metal so the ingredients aren’t actually touching the it; this also works for a plastic strainer – making it so your ingredients won’t be able to go through the holes of the plastic strainer.
I hope that makes sense, I’m kind of tired right now! 😉
Good luck!
(Apologies for the double post – replied to the wrong person in the first one, & I can’t figure out how to delete it… Heh.)
Yazmin –
It’s best not to use metal with herbs and/or essential oils. It has chemicals that tend to counteract the very qualities that you’re trying to extract.
If you aren’t able to get coffee filters, I suggest trying a plastic strainer (used to drain water from pastas, etc.) with the smallest holes you can find.
Another option – it may not work very well, but it’s better than nothing – is to put a thick layer of paper towels over the metal so the ingredients aren’t actually touching the it; this also works for a plastic strainer, making it so your ingredients won’t be able to go through the larger holes of the plastic strainer.
I hope that makes sense, I’m kind of tired right now! 😉
Good luck!
After my hair lost it’s natural glow when I dyed it blonde, I began looking for a hair oil to restore its healthy sheen. Not only does the Shielo Hair Oil have a wonderful smell, it made my hair silky soft and gave it a lustrous shine.
I tried many different hair conditioning products, only to be left disappointed. Many of the other hair oils I tried either did nothing for my hair, or left my hair incredibly greasy. Shielo’s Oil is the first conditioning treatment that has left my hair silky soft and shiny without weighing it down.
Cool just love the way it works I wish I could do it more often
but I have work.
how long should I leave it in?
as long as you can. the longer the better. people in India leave it in overnight and wash it in the morning. I have done this and it really works. also, see the next post.
How do I get horsetail? I am trying to stimulate my daughter’s hair to grow, it is very thin and doesn’t grow. Also, do all these ingredients need to be oils or herbs? I am new to all this.
Hi Betty and everyon elese on the forum I did the recipe above and followed it preciselly but the neem oil in the oil mixture smells reallyyyyyyy bad 🙁 Is this oil recipe supposed to smell that bad????
Hey Mina,
It’ll smell bad. Neem oil has a distinctly bad smell, so if you’re using it you’ll be gagging for a couple of minutes..
However, the benefits far outweigh the brief moments of discomfort!! 😀
Lux
Thank you for all this lovely advices I like it! yes I my have some idea Geranium essential oil can strengthen the hair, clove bead is good for straiten curly hair if used in carrier oil and left over night, cider wood for dried and damaged hair, rosewood can enhance blood circulation in the hair and stimulate hair growth surprising even hair how had folling long time ego!
Thank you for all this lovely advices I like it! yes I my have some idea Geranium essential oil can strengthen the hair, clove bead is good for straiten curly hair if used in carrier oil and left over night, cider wood for dried and damaged hair, rosewood can enhance blood circulation in the hair and stimulate hair growth surprising even hair how had folling long time ego!
What about hemp oil?
I would advise you to take care with this one because I’ve been “testing” it out for one month and I was mortified to see how dry my hair was after that. And also, my scalp became VERY dry and itchy.
I like hemp oil. I mix hemp oil and coconut oil for shaving base and I also use it in my hair
hi, i am getting confused with these,,please let me know does having the habit of masturbation have any effect on hair??/
Could i use garlic on my hot oil made with castor oil?
i am kinda wondering how to accomplish putting tea into it, do I need to open up the tea bags or just steep them in with the oil??
I have blonde hair and I wanted it to have a reddish tint to it, so I added in smushed strawberries. But my hair just turned out blonder than ever! Did anyone else have this problem?
I would try raspberries. Much more of a red hue.
I would try raspberries. Much more of a red hue.
Hi Crunchy Betty, I’ve been using coconut oil for my hair and I love it. My hair is frizzy and dry, coconut oil has helped me a lot; however it has darkened my hair. What can I do? I want to keep my light brown hair color and at the same time carry on using oils.
i tried this and my hair is completely ruined. It is so dry
You ruined my night. But I love you for it. I was going to have a quick oil treatment and go straight to bed. But then I found myself standing over a pot of oil and herbs and now I am basking in my wonderful chamomile, coffee, peppermint, coconut oil treatment. Lovely!!!
If you’re buying an all natural product, check vitacost.com for prices. I always go there for things like shampoo and oil because its cheaper than retail prices
Is there any difference between using normal coconut oil verses extra virgin cocnut oil?
What am I doing wrong? I have very fine hair about the length of my chin. It dries up easily and I want to keep it as healthy looking as possible. Whenever I do a homemade hot oil treatment I have to wash it out with Dawn soap. That can’t be good for my hair. I just did a basic 3T coconut oil, 2 T honey and 8 drops of Jasmine essential oil and that like all my other previous attempts ended with Dawn. Someone please help me, feel like I’m wasting money and time.
i’d recommend less honey, just ’cause it’s so sticky
Since it is suggested to heat up the oil before applying to your hair, can you heat your larger bottle you store it in (meaning it will get re-heated several times over) or do you pour some into a smaller jar for heating?
I’m a natural hair product junkie but after using just about everything in
the book I’ve come to the conclusion that my hair hates olive oil but it LOVES
argan oil. Particularly Pro Naturals Moroccan Argan oil. Must be because it’s
not greasy, has no silicones or sulfates and it just smells great. Problem is
that it’s a bit pricier than other brands, but it’s totally worth it. I’m
always on beyas.ca checking if the price changes but I always end up buying it
as soon as mine finishes, lol.
i think im going to try this with coconut oil, sweet almond oil, black tea, chamomile, peppermint EO, lemon juice and tea tree oil….. wish me luck!
Hello! I have been reading EVERYTHING on your blog these past few days. Amazing recipes and ideas! Thank you for sharing! 🙂 I was wondering about using peppermint with olive oil. I want to stimulate hair growth. Should the peppermint be fresh or dried? I happen to have both but I’m not sure which one would be best to use. Thank you!
u could use both
You mentioned that aloe is an option to add to the herbal infused oil. Do you cut up the aloe leaves? Also, on the suggested herbs for moisturizing hair, there are several herbs listed (rose petals, calendula, etc.) Do you choose one or do you suggest using them all together in one jar of herbal infused oil?
Recommend*
Highly do NOT reccomend banana in the hair. Just a word of warning. 🙂
Oops, why not? I have banana in my hair right now…what horror do I have to look forward to?
I absolutely LOVE banana in a hair mask. It makes my hair have so much body and bounce!
So just how much of the oil(s) are you supposed to use? Just a few Tbsp’s or half a cup or what? I have long hair (down to about my lower back), and when I tried following the directions, I was disapointed with the how little the amount I had. Also, is the mixture supposed to saturate your hair, or just dampen it? And should you start with wet hair, or dry hair?
I would appreciate any advice, thanks. 🙂
How have I not been in the loop on your blog? You are terrific and it’s like you’ve answered all of my at home beauty questions without me even having to ask. Thanks for creating such a wonderful blog!!!
I wonder if turmeric would add a nice mango colour to my med blonde hair
I made the recipe you posted above. I was wondering however … do you use all that oil for one treatment? It seems to make quite a lot.
Love your blog!
Neem oil… as in the stuff I put on my veggie garden to kill bugs??
Sorry for posting so many time, hopefully, who know how, can delete the first two. I tried deleting it, instead I ended up reposting it….
I stumbled upon your site and boy, am I happy that I did! It’s awesome and it is exactly what I need right now. Haven’t been using shampoo for over a month now, and overall, turning green and healthy. Since I am still at the begininning of this wonderful journey, I don’t know too many ‘tricks’. I wash my hair with soda or with mustard seed and egg yolks, alternating.
I have very fine, thinning hair. I would love to find out what can I put into my hair, right after washing, to make them look fuller.
I saw the idea about flax seed gel, loved it! Actually, that is how I found your site, by googling homemade hair gel.
Anything else beside that? I tried using baking soda as dry shampoo ( my hair gets oily by the eve if washed in the morning, that’s how bad it is!), but wasn’t able to get the white stuff out…I looked gray all day. Figured would go much better on blonde hair, since I am planning to go back to blonde soon (that is my gift to myself after losing 80 lb). How to solve that problem? Any input and advise would be greatly appreciated.
Has anyone tried Safflower Oil? Do you know if it works or what the benefits are?
I put it in my treatment, and it seemed to work, though I’ve never done a homemade hot oil treatment before, so I have nothing to compare it to. I did some research online and the consensus seems to be that it’s good for hair but not as good as some of the other things mentioned here. I mainly added it because it’s the cheapest oil I own, so I was hoping to get more bang for my buck.
so, weird question…does the oil have to be *hot* to put it on? or is it just called that because that is when you add all the goodies? 🙂
http://munchtalk.blogspot.com/
It’s not so much ‘hot’ but warm, this is so that your hair follicles can open up and absorb the oils and goodies, otherwise you’d just be slathering on oils and washing them off. It’s kinda like how you will get better results from applying your body lotion right after you get out of the shower and your skin is still softened rather than tight dry skin. It won’t do harm to apply it cold, but you’ll certainly see better results when it’s warmed up! Hope this helps, sorry if I blabbled too much. xoxo
Sitting here with my hair all wrapped up in a warm towel and looking like Carmen Miranda. Made an infusion of coconut oil, ginger, nutmeg, and honeysuckle and green tea leaves. Smells sooo good! Wiped off my hands but didn’t wash the oil away. Will be taking a bubble bath before I wash it all out 🙂
I used fresh-dried rosemary to solar infuse olive oil awhile back and we’ve been using that for hair treatments. LOVELY!!!!
I infused a few oils this Summer. One- Henna leaves (dried) in mustard oil. Two- Whole Shikakai and Amla (Indian Gooseberry) and some cayenne in Olive Oil. Easy on the cayenne, it will irritate (just like on the palate) in over dose. Mustard oil too is a bit of an irritant to some, the point though is just that..to stimulate the scalp/follicles and promote circulation.
oh…how I love to use herbs to infuse my oils!!!! I have recently bought essential oils too and using rosemary for stimulating hair growth. Read today itself that even ylang ylang helps with hair growth but if its used in excess, it can cause headaches otherwise I really like that one…will try peppermint and cinnamon too…yes, as you said, one can go on and on about hot oil treatment!!!
OK, kids – I’m afraid. My un-treated, un-coloured graying hair is very soft, fine, and flat., bordering on stringy. I never condition, besides an ACV rinse, because it makes it even softer and flatter. Any comments on how oil might affect it? Or what i could add to give it body and bounce?
Ahhhhh… I made one last night & am enjoying my kids being in their beds for naptime… me… I feel like I have Cinnabon on my head!
1/2 C Coconut Oil
4 Tbs Cinnamon
2 tsp ginger powder
2 T parsley
6 Black Tea Bags emptied
4 Chamomile Tea Bags emptied
Haha… trying to “Stimulate Hair Growth” as my post-pardum hair is TERRIBLE!! Anyway… This smells slightly buttery/coconutty from the oil & totally sweet & cinnamony! It feels all tingly on my scalp… looking forward to my soft mane in a while.
I’ve also done just plain coconut oil with tea tree oil in it… that’s a wonderful hair mask as well.
This sounds amazing. I was given jobaja oil for Christmas 🙂
Does anyone know if this would damage a dye job? I am a faux redhead.
Bisous!
No, jojoba oil will not damage colored hair. I use a temporary color (washes out every 4 to 6 weeks) and lots of jojoba oil. I have dry african american hair, so I have to moisturize, moisturize and moisturize.
This sounds ama
If you add lemon juice, how much should be used? Like a splash or equal amount to the oil or what?
Hi Betty,
If you want to add any water-based product to an oil mixture (like aloe gel), you will absolutely need to add preservatives or use the mixture immediately. No reason to give bacteria any reason to start a colony in the lovely mixture!
I’ve been doing my hot oil treatments (HOT) for 2 years already. I found two things that I’m trying to keep in mind every time I make my HOT now: never ever use too much oil ( oil is a pure LUXURY, so prize it as a greatest gift from Nature to you) and the most important thing – do it regularly. Use a bit of oil, but every week. I really mean it.
And the last thing! Make it a celebration! I already look weird enough with my hair in oil and a huge towel over my head so I celebrate my growing beauty and have a lot of fun!
I feel like I have reached a new level of crunchiness with this post. When I first started reading this blog, I had to make lists, research, and buy a lot of the ingredients. Today, however! I read this, got very excited, mentally checked off all of the ingredients I now *keep on hand* and then — the best part — when I wondered to myself, “What about my no ‘poo-ness? How will I get the oil out?” — there was the answer, right there. And now I shall infuse my oils and await the next post with gleeful anticipation.
Thank you, Crunchy Betty.
I hadn’t really thought about it, but it’s the same for me… I had everything I needed to make this. A year ago, that wouldn’t have been the case!
I infused some olive oil with rosemary and mixed it half and half with castor oil every other night for a while. It made my hair incredibly soft but could be a little tricky to get out. Sometimes I used shampoo with a little baking soda mixed in if i over oiled. I got avocado oil for my birthday and it’s my absolute favorite! A word of warning about castor oil, though: you pretty much have to dilute it with a lighter oil. It’s VERY sticky and thick and could potentially do more damage than good if it isn’t diluted.
Thank you!!! thank you!!!! i have been trying to get the courage to do this…putting oil on my hair in the past has not worked out very well for me … like, it took days to get it out … but with the winter dryness, it’s so fly-away and dry and my gray is really shining through! Can’t wait for tomorrow’s instructions.
This is great … I took to heart the CB idea to let hair go au naturale today and discovered 1. it is tre convenient and 2. my hair is both super greasy and dry so … the timing could not be better for a hot oil treatment!
I love hot oil treatments, but I’m with those who dread trying to wash them out. My hair is SO dry, but I feel like any oil weights it down and I have gross oily clumpy NASTY hair. That’s why I liked the molasses treatment- it didn’t necessarily do anything wonderful for my hair but at least it washed out! : ) Can’t WAIT for tomorrow!
So, I’m not what one would call “good at waiting”. Some may call me an instant gratification seeker. Some may call me obnoxious. But that would be rude. Long story short, I’m sitting here with a coconut oil and avocado mush mixture on my noggin. That’s right. Without waiting for tips on how us no ‘poo-ers (weird) wash it out. I’m pretty hardcore like that. That sound you’ll hear is me sobbing come 4 in the morning with oily, baking soda encrusted locks. You’re welcome.
I did the exact.same.thing. Coconut oil head… I has it.
Hooray! With just one round of baking soda water, I have the softest head ever! It’s like a unicorn mane up there! But I have super super dry hair so it might take more than one round for normal people….Good luck!
Unicorn mane haahahahaha I nearly snorted tea all over the keys that’s a classic 😀
I am so looking forward to the washing-out tips! I love what coconut oil does to my hair, but I usually have to wash it three or four times with sorta-poo, let it dry, (at this point I usually braid it because it isn’t too oily at the scalp) and then wash it again with baking soda and castille soap, then do a BS/ACV wash to get the castille out… sigh. My hair is awesome for the next four or five days, but and I feel like that would last longer if I didn’t have to spend so much time washing it!
Any thoughts on what herbs could be infused that would brighten silver/white/gray hair? (I wonder if hibiscus would turn it pink…..)
The answer might depend on what your earlier hair colour was. Sage is the classic recommendation for gray/silver that you want to darken.
My hair is a dark honey blonde with silve/white hairs shooting through it with increasing numbers. My herbal rinse is: 3 chamomile, 1 calendula, 1 yarrow (for an oily scalp), 1 horsetail teabag steeped in 2 cups of boiling distilled water. To that I add some ACV for a rinse. The herbs condition and the first two help with highlights for all of my hair colours.
Since this is a blog post re oil treatments, there’s no reason why you couldn’t infuse the same herbs in oil.
O.k. gonna go make some now and wait for tomorrow’s how-to-use post… can’t wait!
Oh… almost forgot to say what I used: Sesame, Avocado, and Coconut oils infused with chocolate flavored coffee and a cinnamon stick. After it cooled, I added the pure aloe gel. When I used it for the hot oil treatment the next day, it smelled like dessert. 🙂
I’m fascinated by oil treatments cause I want my dreads to be soft, smelling good as opposed to a smelly velcro rats nest. Oh, and keeping a happy scalp!
I’m all jazzed and ready for tomorrow’s post!
I tried a super basic hot oil treatment once and it failed 🙁
I think I can’t have rinsed it out properly because my hair was pretty oily after and smelled like olive oil for the rest of the day. Can’t wait for some real tips so I can do it right next time!
Just don’t use too much oil, and whatever oils you use, try to keep them balanced, i.e., using tablespoons of each, except an essential oil, only use drops. Hope this helps.