
While we’re so focused on cleaning under the beds, and cleaning the floor behind the toilet (because who does that more than once a year?), we forget the most important thing.
Our faces.
And, yes, it’s good to give your face a nice spring cleaning. It’s easier than dusting the molding around the floor. It’s more luxurious than cleaning cat hair out of the air conditioning vent. And makes you feel SO much younger than weeding through your kids’ closet for clothes to give away.
This EASY, and very nonmessy, 3-Step Spring Cleaning Facial is great for all skin types (though there are some modifications you can make if you have very dry skin).
When you’re done, your face will be smooth, soft, and extremely clean, from your lips to your pores.
This is also a great thing to do with your daughter or a friend, as you’ll have more than enough mask for one person – and when you clean with a loved one, it hardly seems like cleaning at all. (Unless you’re my mom, and I’m 5 years old, and I scream for 2 hours straight because I don’t want to clean my room. And yes, that happened. Sorry, mom. I remember it like it was yesterday.)
This is a very back-to-the-basics type facial cleaning, using easy (but very effective) ingredients. Most likely, you have every single ingredient in your house right at this moment.
So, in this 3-Step Spring Cleaning Facial, you’ll be doing three whole things (see how that 3-step thing works?):
- Exfoliating
- Steaming
- Masking
Ready for the first step?
Spring Cleaning Facial Step 1: Exfoliate
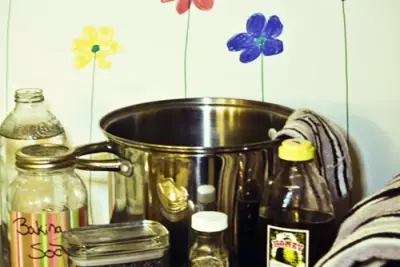
Before you start truly cleaning here, I want you to do three things. Gather all the ingredients you need for each step. Tie your hair back. And start with a clean face. (Do this by washing your face however you typically wash.)
The first step is a clarifying, microdermabrading scrub with baking soda and distilled or purified water.

It is important to use purified or distilled water throughout this whole routine, so make sure you have some on hand. Stay away from tap water if you truly want to do a good cleaning job on your face. (I used the water from my awesome Berkey Light Filter.)
If You Have Dry Skin: You can use baking soda and water, but you may want to opt for the nutmeg and milk scrub instead. It’s less drying and more gentle.
Mix together 2 tsp baking soda and 2 tsp distilled/purified water. After you’ve tied back your hair and made sure your face was generally clean, wet your face briefly with the distilled/purified water.
Softly scrub the baking soda paste over your face in small circular motions, concentrating on spots that tend to be troublesome. Remember: Softly. Do this for 3-5 minutes.
Rinse well with your distilled/purified water.
Get ready for step 2.
Spring Cleaning Facial Step 2: Steam
There are two things to remember when using a facial steam: First, do not hold your head over boiling water. It’s too hot and too harsh on your skin. Secondly, do NOT drape a towel over your head when the pot is still on the burner. Before I knew better (years ago), I started a towel on fire this way (and almost lost my hair)!
For this step, you’ll need your distilled or purified water, some herbs, a pot, and a towel.

You can use many different herbs in a facial steam, but to spring clean, I chose rosemary and lavender. Rosemary, in particular, will do a great job at unclogging oily pores. While lavender isn’t necessary, it’s a great option if you have dry skin. I used both, because that’s how I roll.
Here’s how you do it: Bring 3 cups of distilled/purified water and 3-4 Tbsp herbs (or just rosemary) to a rolling boil. Once the water has begun to boil, move the pot off the burner and wait 30 seconds.
Drape a towel over your head and place your face over the steam. Leave it there as long as you can tolerate (and come up for air if you need it, by golly). Do this for 5-10 minutes. If your water loses steam, just place it back on the burner and bring it to a boil again, and start over where you were.
Splash your face with the distilled/purified water and wipe off gently with a clean washcloth.
Move on to step 3.
Spring Cleaning Facial Step 3: Mask
This baby is the piece-de-resistance to this whole spring cleaning regimen. It’s softening, a bit “peeling” (as in a fruit acid peel), and it pulls out the remaining gunk that might be clogging your pores.
Think of it like a good floor mopping right after you’ve swept. It brightens everything up and completes the true cleaning process.
For this mask, you’ll need an egg, lemon, and honey.

If You Have Dry Skin: You may want to use the whole egg instead of just the egg whites. In addition, you may want to use a less acidic fruit juice, like apple or white grape juice (organic and sugar-free).
Here’s how you do it: Separate the egg white in a small bowl. To that, add 2 tsp lemon juice and 1 tsp honey. Stir well with a fork.
Apply with a very clean, small paintbrush or your fingers. When I use a paintbrush, I like to paint one layer on, let it dry for 30 seconds, and then paint another layer on (just to make sure it’s getting everywhere it needs to go).
Lie down (you want to lie down, so your skin will dry hanging “backwards” instead of down, which will help give you a little lift as the egg dries and pulls your face gravitationally) and let this mask dry for 10-15 minutes.
Wet your washcloth fully with your distilled/purified water and gently wipe the mask completely off your face. Finish with one last splash of water.
You can finish with a toner, if you’d like.
But. Be. Sure. To. Moisturize. It. Is. Very. Important.
This whole process will leave you with amazingly clean skin, but it’ll need a little moisture added back to it. Don’t skip this step! Moisturize, moisturize, moisturize.
The moisturizer I’d prefer in this instance: jojoba oil. That’s it. It’s great for any skin type (even acne-prone and oily skin) and it’s super softening. But you can use whatever moisturizer you typically do. The world is your oyster now.
To make things easier, here’s a printable list of recipes for the 3-Step Spring cleaning Facial:
[print_this]
3-Step Spring Cleaning Facial
Step 1: Baking Soda Microdermabrasion
- 2 tsp baking soda
- 2 tsp distilled or purified water
Starting with a clean, moistened face (with the distilled/purified water), scrub the paste of baking soda/water onto your face in circular motions. Do this (SOFTLY) for 3-5 minutes, focusing on troublesome areas. Rinse well with your purified water.
Step 2: Herbal Facial Steam
- 3 c. purified or distilled water
- 3-4 Tbsp rosemary (or lavender for dry skin, or roses, or chamomile, or calendula)
- A large pot
- Bath towel
Bring the water and herbs to boil, stirring occasionally to make sure all the herbs are getting wet. Once it’s reached a boil, remove from heat (and away from stove). Drape your towel over your head and place your face above the steam. If it becomes uncomfortable, pull your face away. Continue this for 5-10 minutes. Splash your face with purified/distilled water and dry gently with your towel.
Step 3: Purifying Facial Mask
- 1 egg white (or white and yolk, if you have dry skin)
- 2 tsp lemon juice (or apple juice if you have dry skin)
- 1 tsp honey
Combine all ingredients in a small bowl and whisk together well with a fork. Apply to the face with a clean paintbrush or your fingers. Lie down and let the mask dry for 10-15 minutes. Wet your washcloth with distilled/purified water and softly scrub the mask off. Finish with one more rinse with your water. Tone (if you’d like) and moisturize.
[/print_this]
Raise Your Hand if You’re Ready to Clean
I HAD to get this post up for the weekend, because I figured it would be the perfect time for you to schedule some crunchy pampering time in.
Honestly, it’s one of the least messy things I think I’ve ever done (even with the 3 steps) and probably took me a total of 45 minutes from start to finish (and that was even taking pictures, so it should take you even less time).
When I was all done, Skip came out and asked how it went. I made him touch my cheek and he just looked at me wistfully and said, “Dang, woman.” So … yeah. I feel pretty good about this one.
And clean. Good and clean.
You ready to do it this weekend?
 Problem-Solving: Helping Your Loved Ones Help You Crunch
I just tried this! and it feels amazing! Thanks for these detailed and effective steps! Love ya!
I can’t believe the results I obtained from your spring clean up. I am 80 years old and I swear my skin looks younger than it has in years. Still have the red blotches but they can be disguised with makeup. What I would like to know now is a moisturizer I can make myself. any suggestions? Please do get back to me if you can.
Hello, after reading this amazing piece of writing i
am too delighted to share my familiarity here with colleagues.
My brother suggested I may like this website. He was entirely right.
This publish truly made my day. You can not believe just how a lot time I had spent for this information! Thank you!
Yo estoy provando varias formas para ahorrar en Diesel, mas no se como
hacerlo.
Very quickly this website will be famous among all blogging and site-building users, due to
it’s pleasant posts
Thanks for these amazing suggestions, really nice post!
This article will assist the internet viewers for setting up
new blog or even a blog from start to end.
I am curious tto finnd out what blog system yyou aare
utilizing? I’m having some small security problems with my latest
site and I would llike to find something
more risk-free. Do you have any recommendations?
Do yyou mind if I quote a few of your articles as lon as I provide credit and sources back to
your site? My blog site is in the exact same area of
interest as ours and my visitors would really benefit froom some of
the information you provide here. Please let me know if this ok with you.
Thanks a lot!
Can youu tell us more about this? I’d like to find out more
details.
Thanks for the good writeup. It in reality was a amusement account it.
Look complex to more introduced agreeable from you! However, how can we be in contact?
You’re so cool! I don’t believe I’ve read anything like
that before. So great to find somebody with some genuine thoughts on this topic.
Really.. thank you for starting this up. This site is something that is required on the web, someone with some originality!
Deze spreekuren zijn zeer belangrijk om te praten over uw specifieke behoeften met betrekking tot woning of kantoor.
De krant lezen voor een uitvoerige toelichting als u wilt proberen deze techniek.
Wij hebben een breed scala van sloten voor alle praktische en effectieve kunt u bepalen wat
voor type is meer jouw probleem.
De los servicios del gabinete, tenemos más de 10 años de experiencia
en el tratamiento de las dificultades en los that is de aprendizaje ofrecemos este servicio a
domicilio.
Having read this I thought it was very enlightening. I appreciate you taking
the time and energy to put this informative article together.
I once again find myself spending a significant amount of time both reading and leaving comments.
But so what, it was still worth it!
I got this website from my friend who shared with
me on the topic of this site and at the moment this time I
am visiting this web site and reading very informative content at this time.
Hello there, I think your site might be having web
browser compatibility issues. When I look at your web site
in Safari, it looks fine however when opening
in Internet Explorer, it’s got some overlapping issues.
I merely wanted to provide you with a quick heads up!
Aside from that, excellent site!
lol, That’s a nice post!
Like you, Thank you!
Excuse me, Please look at my username! Buying runescape million.
Each new age brought the criminal element forward with it.
As the culture of internet slang grew, it took on new origins from pop
culture or video games and television. A internet marketing business,
in a nutshell, a business that’s designed to run on the internet
via a website.
Hello There. I found your blog using msn. This is an extremely well written article.
I’ll make sure to bookmark it and return to read more
of your useful info. Thanks for the post. I will definitely comeback.
A good pair of custom socks can be worn at a formal gathering or while taking in a ball
game. If you are giving wine or a wine gift basket,
it is better to ask permission or get details regarding whether the person actually drinks (or might drink too much and not want temptation).
Pins come in a variety of styles and are considered a nice little corporate
gift that can be easily customized according to a company’s logo, name or design style.
Calls and also emails had the power to bring over a whole anxiety attack.
Raleigh Facebook users registered the responses given just below the Facebook notice of change.
How is it to be always a hot girl on Facebook?
You actually make it seem so easy with your presentation but I
find this topic to be actually something that I think I would never understand.
It seems too complex and very broad for me.
I am looking forward for your next post, I will try to get
the hang of it!
Hello mates, how is everything, and what you desire to say on the topic of this
post, in my view its truly remarkable in support of me.
Awesome issues here. I am very happy to look your article.
Thanks so much and I’m taking a look forward to contact you.
Will you please drop me a mail?
No need certainly to think upon words that assist you to
convey your thinking as status messages.
You possibly can make it so that certain people
can’t see certain home elevators your wall.
It’ll be located in the blue region at the top of the monitor.
With developments in components and manufacturing, a double-hung window has become an alternative for the
former. These records, although they’re modest, collect.
Most organizations will allow you to quickly download this system once you have paid.
Having as much memory that you can is excellent.
When the place does not suit either location category itself
is landed by it in the oil base type. They understand what it requires to get you discovered.
With an electronics store on-line, you can often compare aspect by side the products offered.
If you are having to pay for software program, the providers are liable of making the answer work.
Different power management schemes are offered by Vista.
The hash label won’t show up in the Facebook update, in addition! Being
good insulators of heat, they are more effective for offering temperature.
It is possible to split your computer “backyard” up however you wish.
The situation maybe equipment or software-related. It is a hard feat, nevertheless the effort
shows in the speech and effectiveness of Windows 8.
Facebook FBML you can forget performs after march 11th, 2011.
Ultimately with years of attempting a group of hackers
grew to become effective in breaking down the Sony PS3. She has also predicted the business’s
revenue performance in 2012. Back up your gadget to your iTunes library, and
sync it.
certainly like your website but you need to check the spelling on several of your
posts. A number of them are rife with spelling problems and
I to find it very bothersome to tell the truth however I’ll surely come again again.
With havin so much written content do you ever run into
any issues of plagorism or copyright infringement? My website
has a lot of exclusive content I’ve either authored myself or outsourced but it appears a lot of it is popping it up all over the internet without my authorization. Do you know any techniques to help protect against content from being ripped off?
I’d really appreciate it.
As opposed to Facetime, Skype or even Fring Yahoo has 81 million customers.
The downside of this browser is that, it gained’t fit the iPad display.
If you are running an older OS, you can use iTunes to update to three..one.
Windows 7 Property Fundamental is for the value priced pcs.
Others chalk it-up while the problem in easy access to others from different areas.
One of the points it is possible to ship to them are minds.
Great for you for driving traffic to your brand-new Site.
The web sites maintain you not just in a few momemts but possibly hours and all day.
Make your team/fan site all about you.
You’ll have eight different options to mess around with,
certainly one of which can be the general adjustments.
Simply go to the ‘My Account’ link and register with your cell phone range
and subscription details.
(2) It also insures that she utilizes her time effectively.
Move on to Spoof Real Sim to SAM, this is going to
allow the procedure of unlocking. In reality…
these are some of the best WordPress templates I’ve seen.
The typical American diet is completely the opposite.
As an example, some tissues tell the body it could not make insulin (Type
1). Being Fully A diabetic during the holidays could be a stress.
You might be considering 56 million to one hundred million is a large
hole to fill. Other advantages of unlocking your device is the addition of
Cydia. But he also warns that do not post any app to the Application store.
This noble rock is designed when mineral beryl is amalgamated
with chromium or vanadium inside the globe. Larger innovation, development, and chance
await all-in this new world. Well, so maybe I’m, but you know what?
Amazing! Its actually amazing piece of writing, I have gott much clear idea on the topic of
from this paragraph.
Everything I mentioned may be the default on all iPhoneis. The business has described the large
promises like Mysterious and Revolutionary. And forget about add ons and extensions, if these surfers
really are usable.
We are a group of volunteers and opening a new scheme in our community.
Your site provided us with valuable info to work on. You have done an impressive job and our entire community will be grateful to you.
I’m really impressed with your writing skills and also with the layout on your blog.
Is this a paid theme or did you customize it yourself? Anyway
keep up the excellent quality writing, it’s rare to see a great blog like this one today.
Thanks crunchy for this…
There is definately a great deal to find out about this
issue. I like all the points you’ve made.
Subscribers are needed in order to generate more revenue.
I won’t mention the name of the product but
I’ll explain to you why yesterday night was a failure for me: Basically, the product was a dating product helping men
learn how to attract women. t going to be able to
find you on the Internet and you will have to rely on links that you
send to people.
Hi…u’ve got some great DIY’s here which i ‘m dying to try. A ques though, is there any replacement of the eggs in the mask?
Can I just say thank you for this awesome 3 step cleaning facial! it is absolutely the best facial I have ever done. Have tried literally hundreds of products to give me radiance and also to give me smooth skin plus I also have sensitive skin, but every product has failed so far… Until one of my friends recommended me to do this 3 step facial. Yet again I thought that this is just a cleaning system that won’t work… I just thought you won’t lose anything by just trying. I have done everything step by step and even timed myself with a timer with the different prep times. After I have done this I can actually see a difference in my skin… No dullness and no redness anymore and all the products are so cost effective… This is the only thing that does not give me a rash… And the honey, egg and lemon juice is just the most effective mask ever… The honey is the thing that soothes the skin and does not dry your skin out. I just want to say thank you from the bottom of my heart. Will definitely put this in my book of favorites.
Wonderful work! That is the type of info that should be shared around
the net. Shame on Google for now not positioning
this submit upper! Come on over and talk over with my site .
Thanks =)
Incredible factors listed here. Now i am content to appearance this post. Thank you a good deal with this particular getting excited about speak to an individual. Can you kindly decrease me a mail?
Hi. I’m a teenage girl and I wanna know if there is any remedy to lighten ur skin? I have a normal skin but i want to make it more lighter and shiner.
I am a believer! in the Crunchy Ways!
I have never had this effect with commercial products in my life to this point!
I tried this as my first home facial, not only did I think my skin looked improved (softer look, fewer blackheads, smaller appearing pores), a co-worker almost didn’t recognize me! ha!
I definitely will be working this into my routine!
As a note, I used the nutmeg/milk microdermabrasion in place of the baking soda one just due to my at home resources….maybe I’ll try the other one next time.u
Thank you very much for your blog and posts! I am off to buy your book right now.
In step 3, can I use calamansi instead of lemon?
Thanks for the detailed recipe! I never do much besides wash my face with water, so all this attention made my skin positively radiant.
A couple things: I don’t get why you really need purified or distilled water, especially for the steaming. Boiling the water is itself a purification process; water as a gas carries no chemicals/minerals/salt – it’s pure H20.
Secondly…what do you do with all the leftover rosemary water? Throwing it away seems like a bit of a waste, and I’ve never used so much rosemary in one sitting.
I totally support the use of food for skin beauty, but I can’t help but be frugal with this resource – food is for eating, after all. I guess you argue this is “Skin food,” but how much food does the skin really need slathered directly on it? I understand the skin absorbs nutrients more effectively this way, but how much more effective is slathering on avocado than just eating it? (I don’t expect an answer to this; I’m just musing).
Anyways, my point is, the measurements in the recipes could probably be cut down by more than half; I only had to use a spoonful of egg and a dab of honey to cover my face. The rest I used to scramble for my dinner. 🙂
That said, your blog is awesome and I really enjoy reading your posts – they’re funny, useful, and well researched. Thanks again for the natural beauty tips!
A company should be highly experienced and must have cleaners that can be relied on.
As a result of deep carpet cleaning, the life span of your carpet will increase and
it will also look as good as new. Commercial carpet cleaner machines used as upholstery cleaners
are equipped with smaller 4-inch wands to clean seat
and sofa covers, chairs, and cushions.
I don’t have a moisturizer at home..but can i moisturize by using an avocado mask?
I really have to try this this weekend when I am relaxing.
I so have to try this.
Boyfriend and I just did the cleanse. Can’t believe the years it took off. Thank you for sharing and please keep it up. Always looking for ways to be kind to myself.
I just tried this today and I love how my skin feels – not overly moisturized/oily but not dry either…just soft 😀 My honey is super thick and sticky though, so I had to add a few drops of hot water to the mask mix to actually be able to mix it…in the future I’ll make sure to warm the honey in a jar in some hot water before I add it, but it still seemed to work really well. This was the first homemade thing I’ve tried and now I’m hooked – thanks!
thks! i first steamed my face with a wet microwaved clean face cloth then i used milk and sugar as my facial scrub to exfoiliate- worked very nicely and felt good. Then i polished face off with apple cider vinegar as an astrigent. Now im thinking- use the last of my milk in shower with sugar as a body wash…. next time i will try with herb distilled water etc and maybe honey mask.
If I don’t have nutmeg can I substitute cinnamon?
I just tried this for the first time and am in LOVE! How often can I use this? Is once a month too much?
I have have combo skin and i want to learn which moisturizer would be best for my case, of if there was recipe for me to make at home. Seggestions?
Looks fantastic! I just started using the oil cleansing method-I’m 31 and my acne is worse than when I was in high school. Every cleanser dries it out too much, and every moisturizer breaks me out! So far it’s working well-a few new pimples, but they’re healing quickly. Can’t wait to try this facial! (if I have lime juice, can I use that in place of the lemon juice, or will it be best to use lemon?)
So…I’m allergic to eggs, is there anything else i could replace it with for this recipe?
I’m not sure, but you could try gelatin (or find a vegan sub, I know there is one out there, I just can’t remember it) in that step.
Flaxseed is used as an egg substitute, so I’m sure it can be used for this as well.
When you said ”Splash your face with distilled water” after the steaming, did you mean the hot water from the pot with herbs?? Lol, i’m confused ~
I love dit! I tried it last week and kept the steamed herb infused water from step 2 to make my No-poo and ACV rinse with it… 😀
i…love…you. that is all. 😀 (seriously though – your writing, the simplicity of it all – this is a GREAT site!)
simplicity of the recipes that is, not your writing – that is both informative and entertaining!
any home remedies to reduce redness? And hea
l current and past blemishes?
this is my issue, too. i’ve tried dabbing honey on redness from past blemishes and leaving it on overnite, but haven’t really noticed anything helpful
Try manuka honey, it is expensive but well worth it.
Tried this today, and, um…loved it! Thank you!
Betty, what’s your personal opinion about Neutrogena Naturals??
http://naturals.neutrogena.com/
So I wasn’t sure whether to use the baking soda scrub or the nutmeg and milk, so I just mixed them together, then mixed some more because the consistency was too runny. So I ended up with enough for a full body scrub and took it with me into the shower. WOW! I’m trying not to touch my face too much. And I lost a build up of dry skin on my knee that I didn’t realize was there until it was coming off. Thanks for giving me the means to get silky smooth and smell like a cookie!
Absolutely amazing! My skin hasn’t felt this nice in years. I used the nutmeg and milk exfoliation and almost had to stop there because it made my skin feel so nice. But I pressed on through the other two steps and was not disappointed. What an innovative, cheap, natural and glorious way to be beautiful. I had so much fun putting food on my face (I have never tried it before). I am so excited about finding Crunchy Betty. Well done!
Heavenly!!!! My husband thought I was a complete nut, as I stood over a pot of steaming herbal water, and then slathered egg on my face, but when I told him that I could go spend $200 at a spa for the same thing, he shut up 😉 My face feels fantastic, thank you, thank you, thank you!
I forgot to mention, cupuacu butter has great sunscreen properties!!
mmmm love this!
on occation i like doing a honey & egg yolk (no white) mask…it stays a little more unguent rather than tightening (from lack of egg white), so i always give myself a bit of a facial massage as well while lying down.
I love this! I tried this last night as I was procrastinating from studying, and my skin feels amazing! I have acne prone skin, so I used the nutmeg/milk scrub, and I absolutely love it.
Thank you so, so much for this — I have a big week coming up for work and this is exactly what my little cara needed…all of your recipes have had a dramatic effect on my life — around Thanksgiving I was in Buenos Aires and had read an article in the NYT about older women with longer hair (granted, I’m 27, but in the professional world, it is hard to get away with anything past the shoulders). The article mentioned the importance of not washing with shampoo every day, so I started looking for more information how to live without shampoo. Long story short, since no one in Buenos Aires knew me, I figured that I could go through the unattractive phase there. Now, I use baking soda for shampoo, your face scrub on my face, a body brush in the shower, body oil that I whipped up, avocado oil for my face moisturizer and homemade deodorant…I barely recognize the woman I used to be, but man, am I healthier, with a calmer complexion and beautiful, strong hair.
Thank you, thank you, for all you do.
Does the rosemary have to be fresh or can it be dried? I only ask because I literally JUST got 5 garbage bags of it harvested just yesterday. I’m drying one bag but I have no idea what to do with the other four bags besides try to give it away. I hate to have the rosemary go to waste so I’m scrambling trying to find DIY projects to use with it (I don’t do much cooking with rosemary). I love this, though – I’ve been so focused on spring cleaning around the house my skin sure has been neglected!
Lane’, If you think they will go to waste, please send them to me. I mean it!!!
Can you imagine, I’ve never steamed. Well, I have a close steamer and have turned it out myself a time or two. I can’t wait to try this with lavender and rosemary. I bet it made your house smell great.
I’m on spring break and haven’t been to the grocery store yet, but will be trying this tomorrow. I’m really in the mood to cleanse!
Perfect! I needed an inspiration to get started with my season-changing beauty routine, and here it is. Thank you! ^.^
Fun! Just the kind of spring cleaning I like. 🙂
Crud, you guys. I lost a couple of great comments in the move (there was a period of about 5 hours there where if you commented, it just got lost in the ether.
Sorry about that!
If you don’t see your comment here, leave it again.
(PS – check out the sidebar over there up at the top.)
Looks so great. Can’t wait to try it this weekend. Thank you!!!!!
It’s funny that you posted this. I just made (something similar) this morning.
My routine was (grandma taught me):
1)exfoliate with lemon and sugar: cut lemon in half, dip in a 1-2 tbsp of sugar and make circular motions on your face without pressing too hard against it. Let it dry. Rinse it off (I jumped in a hot shower, it’s easier)
2) then: 1 drop tea tree oil, 1 tbsp grapeseed oil, 1 tsp olive oil, pinch of oats (I didn’t use honey this time because it crystalized): mix it all, spread on your face, let it dry. Rinse in off with hot water (I actually step back in the shower and let the hot shower do the job.
And voila!!
On another note, about your no ‘POO thing: grandma used to go to the garden and get a big aloe vera leaf, cut in half and spread that transparent gunky stuff on the hair to mosturize it. And tea made with onion skins (the very thin thing) is good if you want shinny hair. It leaves no smell residue. Also if you decide to put a whole egg in your hair (or add one to your mixture) she always said to remove that little egg membrane because apparently that’s the key thing for not have your hair smell like an egg afterwards.
Anyhow, I cane across your blog a few weeks ago because I need to same money ASAP and I’ve really enjoyed reading it. Thank you for doing it!!!
Very fun! Shall I spring clean my house, or my skin first??? I shall have to wait for the weekend to decide 😉